CONTENTS:
 INSERTING COMMENTS THAT WILL NOT SHOW ON PAGE
 USING THE FONT TAG TO CHANGE FONT STYLE, SIZE AND COLOR
 LINKING TO SPECIFIC PLACES WITHIN A PAGE:
 ALIGNING IMAGES
 USING BACKGROUND SOUND
 ALIGNING PAGE TO FIT ON A BORDERED BACKGROUND
 AN EASY WAY TO MAKE LISTS
 MAKING A BIG BLOCK OF TEXT INDENT
 USING A NON-SCROLLING BACKGROUND
 MAKING LINK BUTTONS WITH CODE
 INSERTING COMMENTS THAT WILL NOT SHOW ON PAGE:
use the following and anything inside it will not show up as text on your page but will be for your notes only.
<!-- -->
 USING THE FONT TAG TO CHANGE FONT STYLE, SIZE AND COLOR:
- FACE= (a specific font style name)
- COLOR= (a specified color other than the one named in the BODY tag)
- SIZE= (a size other than the default size) [-6, -5, -4, -3, -2, -1, +1, +2, +3, +4, +5, +6]
You can specify any font "FACE" (style) you choose, but only those fonts loaded on the hard drive of the viewer’s computer will be seen, otherwise he will just see the browser’s default font. You can change this as often as you wish within the page. For example:
<FONT FACE="Arial">
You can specify any font "COLOR" you choose. Lets say you want one word to be a different color than the text color specified in the <BODY> tag, you can put the color change in a <FONT> tag right before the word, then you would have to use a </FONT> tag right after the word to change the color back. For example:
My favorite color is<FONT COLOR="006400">green </FONT> because it is the color of nature.
The text would then appear like this: My favorite color is green because it is the color of nature.
You can specify any font "SIZE" you choose from this range:
[-3, -2, -1, +1, +2, +3, +4, +5, +6]
the plus numbers being the larger ones.
You can combine more than one attribute in the same <FONT> tag like this:
<FONT FACE="Arial" COLOR="FFFFFF" SIZE=+5>
Notice the required spacing between each attribute. Notice that the font style is capitalized because that is the way the font's style name is written in the computer's font files. And remember that a <FONT> Tag needs a corresponding </FONT> tag.
 LINKING TO SPECIFIC PLACES WITHIN A PAGE:
FOR EXAMPLE.......lets say you want to place the link on "index.html" page and to link to "pg2.html" page and to the words "animals" on that page.
- STEP 1: place this tag on "p2.html" (the page you are linking to) at the point where
you want the anchor to be
<A NAME="animals"></A> - STEP 2: place this tag on "index.html" (the page where the link is to be established)
click <A HREF="p2.html#animals">here</A> read about animals
When you want to link to an anchor on the same page, set up the same way but you leave off the name of another page in the tag for example if the anchor for the word "animals" was on the same page as the link, the tag would look like this
click<A HREF=#animals>here</A> to read about animals
(the list of links at the top of this page, entitled "CONTENTS", is an example of linking to anchors on the same page)
 ALIGNING IMAGES:
<CENTER><IMG SRC="image.gif"></CENTER>
You also can line up the image with the line of text next to it with:
- ALIGN=TOP aligns the text with the topmost part of the image
- ALIGN=MIDDLE aligns the text with the middle of the image
- ALIGN=BOTTOM aligns the text with the bottom of the image
However only one line of text will be displayed beside the image. If the text needs to wrap to a 2nd line, then it will begin the 2nd line under the image. If you want several lines of text to be displayed in the blank space to one side of an image, then use the following procedure:
- write the image tag using either ALIGN=RIGHT or ALIGN=LEFT inside the tag to indicate which side you want the image to be on
- then before you write the text, use <ALIGN=RIGHT> or <ALIGN=LEFT> to indicate which side you want the text to be on.(note that this will be opposite of what ever side you chose for the image)
FOR EXAMPLE: if your image was on the left and your text on the right, then use this tag after
<BR CLEAR=LEFT> (note there is a required space between BR and CLEAR)
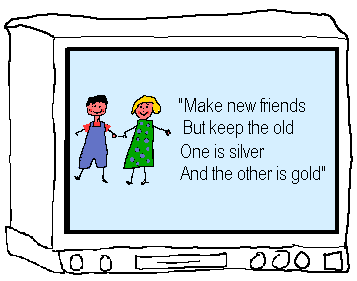
Following is an example of using text beside an image:
<IMG SRC="kids.gif ALIGN=LEFT>
<ALIGN=RIGHT>
"Make new friends<BR>
But keep the old<BR>
One is silver <BR>
and the other is gold"
<BR CLEAR=LEFT>
and this is how it would look as displayed on a page:
 USING BACKGROUND SOUND:
<EMBED SRC="_____.mid" width=2 height=0 autostart=true loop=true>
<noembed><bgsound src="_____.mid" loop=infinite> </noembed>
Note that you will substitute your file name for the blank line two times and note also that there is a required space between each of the attributes in each tag. You may put this tag anywhere in your document between the BODY and the CLOSE BODY tags. I like to put it at the top under the BODY tag so that it can begin playing right away while the rest of the page loads.
 ALIGNING PAGE TO FIT ON A BORDERED BACKGROUND:
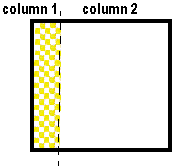
You set up the TABLE tag like this and place it right under your BODY tag:
<TABLE BORDER=0 WIDTH=85% ALIGN=RIGHT> <TR><TD>
You are saying that the page, from this point until the CLOSING TABLE tag, will be arranged as a borderless "table" and the cell on the right will be 85% of the page. (adjust this percentage to fit the width of your border). Then the <TR> is saying begin the first (and only) row, and the <TD> is saying here's what is in the right column. Then down at the bottom of your HTML document right before the CLOSE BODY tag, you will put the CLOSE TABLE tags:
</TD></TR> </TABLE>
Sounds confusing? Just add those opening and closing tags, adjusting the percentage to fit your border, and you have it! More on using TABLES in advanced extras.
 AN EASY WAY TO MAKE LISTS:
THINGS I LOVE:
<UL>
<LI>God
<LI>my family
<LI>sunshine
<LI>gardens
<LI>beaches
<LI>rainbows
</UL>
would be displayed like this:
THINGS I LOVE:
|
<UL TYPE="SQUARE">
And if you want the list to be numbered, then just use <OL> for ORDERED LIST and your list will look like this:
THINGS I LOVE:
|
<OL TYPE=I">
 MAKING A BIG BLOCK OF TEXT INDENT:
<BLOCKQUOTE> </BLOCKQUOTE>
 USING A NON-SCROLLING BACKGROUND:
BGPROPERTIES="FIXED"
Be aware that this will ONLY work at present with the IE Browser. Netscape and the others will ignore the command and still scroll your background. Also keep in mind that large background images take a long time to load so if you use one, limit your other images on the page.
 MAKING LINK BUTTONS WITH CODE:
<FORM METHOD="LINK" ACTION="http://members.aol.com/ladybug703/index.html/">
<INPUT TYPE="SUBMIT" VALUE="CLICKABLE BUTTON">
</FORM>
then substitute whatever URL you are linking to (always use the entire URL here), and for VALUE= substitute what ever words you want to appear on the button. Our example will appear on the page like this and will be linked to my personal web site. Go ahead and click on it, but remember to return here for more classes.
 It looks like you have graduated.....
[ HOME , lesson 1 , lesson 2 , lesson 3
extras , advanced extras , colors , graduation ]

visit Ladybug's Garden, my personal pages
