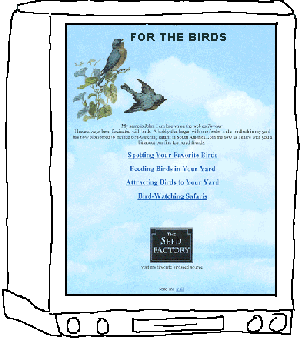
Now you are ready to add the content of your page. It will all fit between the opening <BODY> tag and the closing </BODY> tag. For demo purposes, lets say your hobby is bird-watching and you want this to be the theme for your site. You have decided to call it "For The Birds".
 ADDING A HEADING:
<CENTER><H1>FOR THE BIRDS</H1></CENTER>
There is an alternative method (which I prefer) to determine text size which will be discussed later in extras. For now we will stick to the basics.
 OBTAINING AN IMAGE:
|
A wonderful utility for drawing and editing images is Paint Shop Pro. A free trial version can be downloaded from the web here.
 ADDING AN IMAGE:
Other info, not required, but helpful is: alternate text message for browsers which cannot see the image (ALT=), and the height and width in pixels of the image (HEIGHT= WIDTH=). It is a good idea to include the height and width because that will make the page load faster.
a note about determining the height and width of an image: Many graphics programs display this information when an image is opened. Also you can also find it by opening an image with Netscape Navigator. In the Title Bar after the image's name you will see the pixels (the first number is the width, the second is the height).
So you would type this tag:
<IMG SRC="bird.gif" ALT="Bluebird" HEIGHT="281" WIDTH="318" >
Notice that all the attributes after the equal signs are enclosed in quotes and that there is a required space between each of those attributes and remember that the image's file name must exactly match the name of the file as it is in your directory. There is more about aligning images in the advanced features explained in extras.
 ADDING TEXT:
- you can center it by enclosing in CENTER tags
<CENTER> </CENTER> - you can leave blank spaces by using the NONBREAKING SPACE code
(a whole string of these would move the text over as far as you like) - you can skip down to the next line by using the BREAK tag
<BR>
(use more than one BREAK tag to skip more lines) - you can use the PARAGRAPH tag to set off paragraphs (it skips 2 lines)
<P> - you can make it bold
<B> </B> - you can make it italics
<I> </I> - you can underline it
<U> </U> - you can strike through it
<S></S> or the newer <DEL></DEL> - you can write "subscript" like in H20
<SUB></SUB> - you can write "superscript" like 42 (4 squared)
<SUP></SUP>
Changing the size and temporary color of the text is explained later in extras.
You have decided to center your text on the page and have it skip to the next line after you state your name, and you want to use italics to set off your screen name. You would type this:
<CENTER>
My name is John. I am known on the web as <I>Tweeter </I>
<BR>
I have always been fascinated with birds. A hobby that began with one feeder and a birdbath in my yard has now blossomed to include bird-watching safaris in South America. Join me now as I share with you a bit about our fine feathered friends. </CENTER>
 LINKING TO OTHER PAGES ON YOUR SITE:
<CENTER><A HREF="spotting.html"><H2>Spotting Your Favorite Birds</H2></A></CENTER>
<CENTER><A HREF="feeding.html"><H2>Feeding Birds in Your Yard</H2></A></CENTER>
<CENTER><A HREF="habitat.html"><H2>Attracting Birds to Your Yard</H2></A></CENTER>
<CENTER><A HREF="safari.html"><H2>Bird-Watching Safaris</H2></A></CENTER>
Notice that each link is enclosed with the <CENTER> and CLOSE </CENTER> tags. Notice that each link is enclosed in a HEADING tag with a size 2. Notice that each link is enclosed with the ANCHOR and CLOSE ANCHOR tags. Notice that the ANCHOR tags contain the URL you are linking to, in this case the short file name version since these are pages within your own site. Notice that the URLs are enclosed in quotes. Also notice that there is a required space between the A and the HREF= because the HREF= is an attribute of the A tag.
 ADDING AN IMAGE THAT WILL BE LINKED TO ANOTHER PAGE:
<BR><BR><BR><BR>
<CENTER> <A HREF="http://www.birdseed.com/"><IMG SRC="sflogo.gif" ALT="Seed Factory logo" HEIGHT="118" WIDTH="143" BORDER=0></A> </CENTER> <CENTER>visit my favorite birdseed source</CENTER>
Notice that you wrote 4 LINE BREAK tags to provide a bit of empty space. Notice that your IMAGE tag with all its attributes (SRC, ALT, height, width, border) is enclosed by ANCHOR and CLOSE ANCHOR tags. Did you notice that there is a new attribute (BORDER=) in there this time? When an image is a link, then the browser will want to draw a box around it in the link color instead of underlining it as text would be. To prevent that colored box, you can add BORDER=0. Then all that is enclosed by CENTER and CLOSE CENTER tags. Since this time you are linking to a web site outside of your own, notice that you provided the entire URL. Then under that you provided a centered text message.
 ADDING A MAILTO LINK:
Now you want to skip down a few more spaces and provide your email address and make it open a mailto window when clicked on. This is done just like a regular link, except this time instead of linking it to a URL, you will link to a "mailto address". If your email address was "tweeter@aol.com", you would type the following:
<BR><BR><BR>
<CENTER>
send me <A HREF="mailto:tweeter@aol.com">mail</A>
</CENTER>
Notice the 3 LINE BREAK tags that provide spacing. Notice the plain text "send me", then "mail" is enclosed in the ANCHOR and CLOSE ANCHOR tags. The HREF attribute is mailto followed by a colon, followed by your email address. And notice that it is all enclosed in CENTER and CLOSE CENTER tags.
 ADDING THE CLOSING TAGS:
Your HTML and BODY tags began at the top of the document. Now you need to add the accompanying CLOSING tags. Type the following:
</BODY>
</HTML>
Recapping, your document should look like this now:
<html>
<head>
<title>My Page</title>
</head>
<body background="sky.jpg" bgcolor="FFFFFF" text="000000" link="0000FF" vlink="FF0000" alink="FFFF00">
<CENTER><H1>FOR THE BIRDS</H1></CENTER>
<IMG SRC="bird.gif" ALT="Bluebird" HEIGHT="281" WIDTH="318">
<CENTER>
My name is John. I am known on the web as <I>Tweeter </I>
<BR>
I have always been fascinated with birds. A hobby that began with one feeder and a birdbath in my yard has now blossomed to include bird-watching safaris in South America. Join me now as I share with you a bit about our fine feathered friends.
<CENTER><A HREF="spotting.html"><H2>Spotting Your Favorite Birds</H2></A></CENTER>
<CENTER><A HREF="feeding.html"><H2>Feeding Birds in Your Yard</H2></A></CENTER>
<CENTER><A HREF="habitat.html"><H2>Attracting Birds to Your Yard</H2></A></CENTER>
<CENTER><A HREF="safari.html"><H2>Bird-Watching Safaris</H2></A></CENTER>
<BR><BR><BR><BR>
<CENTER> <A HREF="http://www.birdseed.com/"><IMG SRC="sflogo.gif" ALT="Seed Factory logo" HEIGHT="118" WIDTH="143" BORDER=0></A> </CENTER> <CENTER>visit my favorite birdseed source</CENTER>
<BR><BR><BR>
<CENTER>
send me <A HREF="mailto:tweeter@aol.com">mail</A>
</CENTER>
</BODY>
</HTML>
 BE SURE AND SAVE YOUR WORK:
In the next lesson we will work on publishing your page. Meanwhile, save this latest addition to your document the same way you saved in lesson 1. You now have a good basic web page. Of course there are a lot of kewl things you will want to add, but we will cover those more advanced features in extras and advanced extras.

[ HOME , lesson 1 , lesson 2 , lesson 3
extras , advanced extras , colors , graduation ]

visit Ladybug's Garden, my personal pages

