

MAKING CLIENT-SIDE IMAGE MAPS
 USING "MAP THIS"
TO LAY OUT THE COORDINATES:
Since your image map will determine the "hot-spots" based on the coordinates of a grid, we will begin by determining those coordinates. I am assuming that you have already downloaded your copy of "MAP THIS".
- Open the "MAP THIS" program. Click on FILE, then NEW (or click on the "new" icon that looks like a white sheet of paper).
- The pop-up box will say that you need to select an existing image file to use as the map background. I will assume here that you have already selected or made one and stored it in the floppy or folder with other files for your web site. Now click on LETS GO FIND ONE, then you can browse for your file and double-click on it to open it in the MAP THIS program. Notice that your image now has a grid over-layed on it. (if not, then click on GOODIES in the tool bar and be sure there is a check by GRID). If you cannot see your entire image in the window, then grab and drag the edges of the window to enlarge it until your entire image is visible.
- Now click on the SHOW/HIDE AREA LIST icon on the toolbar (it looks like a sheet of paper with a list on it and is to the left of the SAVE icon). This opens up a window with your "area list".
- You can define your selected areas as rectangles, circles, etc. For now, let's stick to rectangles! Click on the blue rectangle icon on the toolbar's far left. Notice your curser now looks like a rectangle with a pointer on it. Use this to draw a box around the first area that you want to be a "hot-spot". Notice that when you did that it also showed up on your "area list" window as "1:rec".
- Double-click on the "1:rec" in the "area list". A pop-up box now shows you the number coordinates for that area. In the space marked "URL TO ACTIVATE..."type in the URL that you want this area to be linked to (be sure to include the quote marks around the URLs).
- Repeat this same procedure for all the "hot-spot" areas on your image.......outline them, double-click area on "area list", name the URL linked.
- Now you are ready to save your map. Click on FILE, then SAVE AS. In the pop-up box type a name for your image map (whatever you choose) and then the URL of the page the image map will be on in the space marked "DEFAULT URL". AUTHOR and DESCRIPTION is optional and can be left blank. Under MAP FILE FORMAT choose CSIM (which means client side image map). Now click OK. Now you will have a standard SAVE AS box where you can indicate the place to save (anywhere you want will be ok, because you are just going to copy and paste part of this file onto your HTML document. Choose what ever you want for FILE NAME and give it a .html or .txt extension. Save it.
 INSERTING THE HTML
FOR THE IMAGE MAP:
Now you are going to place the HTML tags in your document.

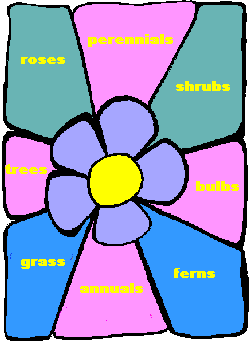
For our example we will say that you are using an image called "garden.gif", you have named your map "flowers".
You have divided the image into areas and want your visitors to go to different pages on your site when they click on each area.
You have done the procedure described above in MAP THIS and have saved your map.
- At the place on your page where you want the image map to appear place an IMAGE tag like this:
<img src="garden.gif" usemap=#flowers border=0>
- Open the saved file you made using MAP THIS. Omitting the <BODY> and </BODY> tags, copy and paste the rest under that IMAGE tag you did in step 1. (you may also omit all the tags with the ! in them. They are there for information only, or perhaps you might like to leave the one giving credit to MAP THIS's author,
Todd Wilson)
<MAP NAME="flowers">
<!-- #$-:Map THIS! free image map editor by Todd C. Wilson -->
<AREA SHAPE=RECT COORDS="15,15,75,120" HREF="roses.html">
<AREA SHAPE=RECT COORDS="90,15,165,75" HREF="perennials.html">
<AREA SHAPE=RECT COORDS="180,15,240,135" HREF="shrubs.html">
<AREA SHAPE=RECT COORDS="180,150,240,225" HREF="bulbs.html">
<AREA SHAPE=RECT COORDS="165,240,240,330" HREF="ferns.html">
<AREA SHAPE=RECT COORDS="75,255,150,330" HREF="annuals.html">
<AREA SHAPE=RECT COORDS="0,225,60,330" HREF="grass.html">
<AREA SHAPE=RECT COORDS="0,135,45,210" HREF="trees.html">
<AREA SHAPE=default HREF="garden.html">
</MAP>
- That's all there is to it! Just be sure and upload your image to the file on the server where all your other page's files are.
more advanced extras
or go to:
[ HOME , lesson 1 , lesson 2 , lesson 3
extras , advanced extras , colors , graduation ]

visit Ladybug's Garden, my personal pages


 USING "MAP THIS"
  INSERTING THE HTML
